Some of the most unique pieces of furniture are often handcrafted. That’s the case with the crate table planter you see here which is made from four repurposed fruit crates and a piece of scrap plywood. It is durable enough to stay out in a screened porch or other dry area year-round and should last for several seasons. Not bad for something made of discarded materials over a single weekend! Here’s how you can build one for yourself.
Step 1: Gather Materials
You will need:
4 wooden crates that are all the same size – Look for these at local orchards or flea markets
1 scrap piece of 3/4″ thick plywood
Liner material: lightweight aluminum sheeting, heavy duty landscape fabric or coconut fiber sheeting Potting soil Whateverplants you’d like to use in your planter. Shown: Lemon Coral® sedum Woodstain (if desired) 1″wood screws Circular or hand saw Power drill Staple gun Sandpaper Wood glue Measuring tape Carpenter’s square ruler Pencil
Step 2 (Optional): Stain the Wood
Depending on the look you are going for and the wood crates you are using, you may or may not need step 2. If you like the original finish of the crates, skip this step. If you would rather stain them, this is the easiest time to accomplish that task. Be sure to lightly sand the wood before applying the stain.
Step 3: Assemble the Crates
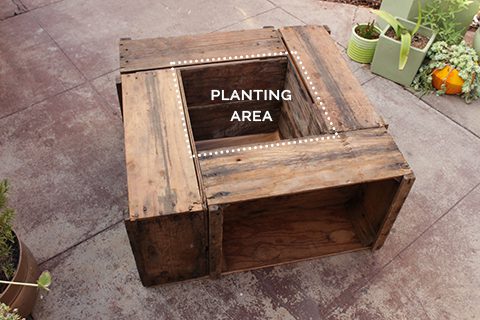
Set the four crates on a level surface and arrange them in a square like you see here, with the bottom of each crate facing the center of the square. If you’re having a hard time visualizing how it will lay out, think of it like two capital Ls mirroring one another. The crates should fit snuggly together without much of a gap between the sides that touch.
Screw the crates together through the sides using 1” wood screws and your power drill. Four screws per side should be sufficient. Once you have screwed all the crates together, they should feel solid. If not, add more screws.
Step 4: Measure, Cut and Attach the Base
In this step, you will attach the assembled crates to the plywood base. Set the plywood on a level surface, then place the 4-square of crates on top of it. Use your carpenter square to make sure the four corners are sitting at clean 90-degree angles. Then, mark the outline of crates on the plywood with a pencil.
Move the crates off of the plywood and check your pencil markings to make sure your lines are perfectly straight. Double check that the measurements you’ve drawn on the plywood match the measurements of your assembled 4-square of crates. Then, cut the plywood with your saw and smooth the edges with sandpaper.
Step 5: Attach the Plywood Base to the Crates
Next, you will attach the base to the crates using wood glue and wood screws. Turn your assembled crates upside down and set your plywood base on top to triple check that it fits and everything lines up. Once you are confident that it fits well, move the plywood off to the side and apply wood glue to the bottom of the assembled 4-square of crates. Then, set the plywood base back on top and press firmly to make good contact. Use 1” wood screws to attach the base to the crates. Let the glue dry before you turn the assembled crate table right side up.
Step 6 (optional but recommended): Add Feet
If you don’t want the plywood base of your crate table to sit flat on the ground, add 4” square wood blocks to the corners to make “feet”. If you use 2 x 4” lumber to make them, it will raise your whole planter up off the ground by 2”. This is a good idea if you plan to use your table outdoors on wet pavement and will also help with drainage for the planter you are about to create in the center.
Step 6: Finish the Planter
Once your crate table is all assembled and the glue is dry, it is time to make a planter out of the center of it. You should now have a nice big square planting space in the center of your assembled 4-square crate table. Use a 3/8” drill bit to make several drainage holes in the bottom of the planter so the water can escape when you water your plants. They will act just like the drainage holes in the bottom of the ceramic planters you use in your garden.
Line the inside of your crate table planter with either lightweight aluminum sheeting, heavy duty landscape fabric or coconut fiber sheeting. The aluminum will be more permanent, while the other materials will likely need to be replaced every 1-2 years. Use a staple gun to attach them to the sides and bottom of the planter. If you use aluminum sheeting, you will need to drill drainage holes through it.
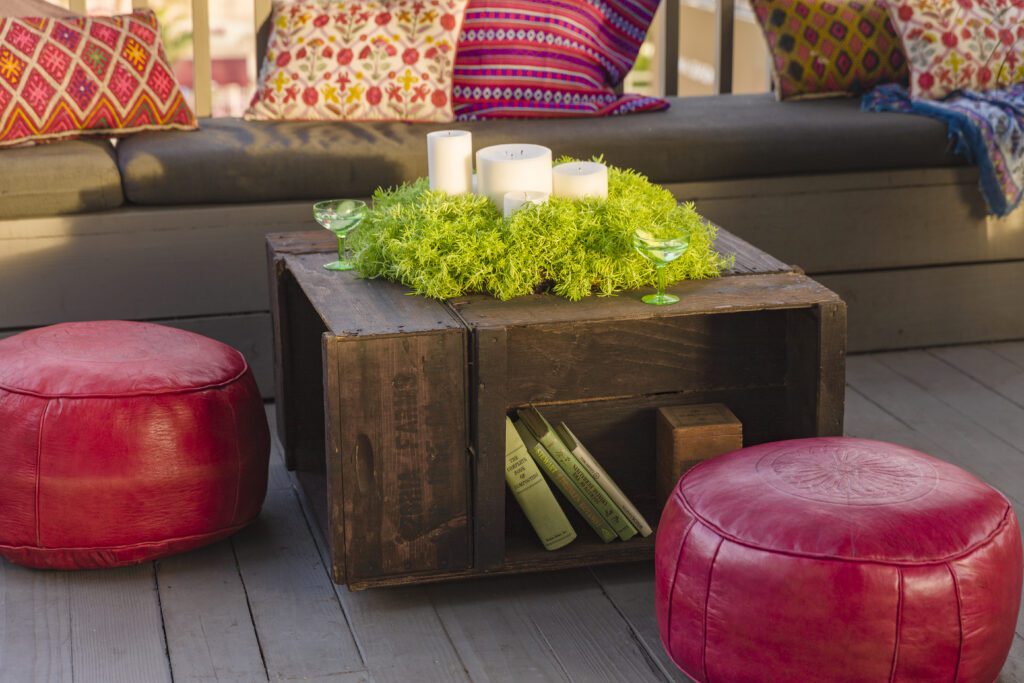
Fill the lined planter with a good quality, lightweight potting soil and mix in a few scoops of continuous release plant food. Finally, your planter is ready to be planted! Lemon Coral sedum, shown in the finished crate table planter here, is a perfect fit because it won’t grow too large, doesn’t shed leaves or petals, and is a fun “touchable” plant and conversation piece. Don’t forget to water your new plants into their new home.
Congratulations on making your new crate table planter! We would love to see how it turned out. Tag us at @gardencrossings on social media so we’ll be sure to see your handiwork.
All photos shown here are courtesy of Proven Winners.